
Ultimate Blog Post Checklist (FREE printable): 11 steps you need to know
What should be on your blog post checklist?
I used to think that you didn’t need a blog post checklist. That blogging was just writing posts.
I’ve realized that you can have the best, most comprehensive content. No one is going to read it if you don’t have a strategy. If you want to make money as a blogger, you have to treat your blog like a business. There hdolas to be a business plan with a marketing focus.gra
An important aspect of this plan is writing posts that both reach and engage your audience. This includes optimizing your post for SEO and promoting it on platforms your audience visits.
This post may contain affiliate links. Please read the disclosure for more information.
How do you optimize a blog post?
How do you even start a checklist for your blog? After a lot of research, below is my Blog process checklist to optimize reader engagement. It’s everything you must do after you finish your draft – BEFORE and AFTER publishing a post. This is the blog editing checklist I follow for every post.
P.S. This checklist will only help you if you have a self-hosted blog. You NEED to be self-hosted (i.e. own your domain) in order to make money with your blog. Here’s a step-by-step guide how to start a self-hosted blog with Siteground hosting for $3.95/month.
Related Blogging Tips’ Posts:
- How to start and make money from a blog
- How I made my first affiliate sale
- Affiliate programs and networks I got approved for and rejected from as a new blogger
1) Check that the content speaks to the reader
If you don’t care about making money on your blog, you can write about whatever you fancy.
To get engagement, you have to write with your reader in mind. You have to be relatable to your audience. Be useful. Solve a problem. It’s important to highlight this point in your first paragraph.
Your solution should aim to be comprehensive. Any questions pertaining to that problem – within reason – should be addressed. You don’t want them to read your post and at the end, have a question and then leave your blog to get that question answered. Because they might never come back.
Put a lot of effort into good quality content. You want your reader to love your post so much, they bookmark your website. They click on your next relevant article. Even opt-in to receive your emails.
2) Include a call to action at the end of the post
At the end of the post, you want to engage the reader.
You want to continue the discussion. Ideally start 2-way communication so you can build that relationship. It’s only through reader engagement that you will build loyalty. Loyal readers are more likely to trust your advice and purchase your products and services.
Here are ways you can engage your reader at the end of your post:
- Encourage them to submit a comment
- Ask them to share your post
- Ask them to follow your social media accounts
- Include your email opt-in
3) Write a CLICKWORTHY title
I used to write titles that summarized the post or targeted the keyword(s) I thought readers were looking for. I never thought about the title’s clickability. What a mistake!
Your title needs to scream click me now! It has to have a sense of urgency and emotion.
I’ve found the FREE Headline Analyzer from Coschedule is an amazing tool that can help!

You just enter in your title. It spits out an assessment score based on the length, balance of words, and headline type (e.g. list, how-to). It tells you how many power and emotion words you have. Common and uncommon words.
I love how you can easily compare a bunch of headlines because you can view your history in a session. Bear in mind that just because one headline has a higher score doesn’t mean it’s better! You know your audience.
4) Optimize SEO
SEO stands for search engine optimization. For each post, you target specific keywords. Ideally, you want to optimize your post so that it comes up on page 1 in Google (and other search engines) when people type in the keywords you’re targeting.
How do you optimize SEO? What is your blog post SEO checklist?
- Use the Yoast plugin (I just use the free version). Ensure the keywords are included in the Yoast boxes for meta title, description, and url.
- Fill out your excerpt section (summary of your post sometimes used instead of your meta description by search engines)
- Sprinkle the target and related keywords throughout the post, especially the introduction, headlines, and the alt text of any images
- Insert links to related internal posts. This will potentially keep your reader on your site for longer and reduce your bounce rate, which is an SEO ranking factor.
- Insert links to related external posts (that are reputable and not competing for the same keywords). Linking to high quality, trusted sites builds your association with these more well-known sites, which Google likes.
- Post has to be 1500+ words as longer content ranks better
If you have a new blog, keep in mind that your SEO referral traffic will take time – at least 6 months. Time is actually one of the ranking factors in Google. The older your blog, the more trusted it is in Google’s eyes. It’s important to lay the foundation and build strong on-page SEO for when your site starts getting recognized.
5) Add social media shareable images and copy
You want to make it easy for readers to share your article to their social media network.
Firstly, you have to create optimal images that fit each network e.g. vertical images for Pinterest, horizontal images for Facebook.
You can use Stencil, Canva or PicMonkey. I’ve used all of these platforms.
Now I only use Stencil because unlike the other tools, Stencil saves so much time. It’s easy and fast to create images. Stencil is perfect for generating social media shareable images:
- Everything you need is in one place. There are over 2 mil royalty-free photos, 680 templates, 1 mil icons, tonnes of preloaded sizes or easily create your own. In PicMonkey, you have to upload the photos. In Canva, you have to pay $1 per photo.
- The preloaded sizes makes it easy to resize images to share on different social media platforms. Once the image is resized, you just have to make a few minor tweaks – it takes less than 1 minute!
- The pricing is all-inclusive. Stencil has a FREE package where you can create 10 images per month, but you have limited access to photos and icons. I’m on their unlimited package for $12/month, which includes unlimited images you can create and save. You get access to their entire collection of photos etc. You also get 100 Instagram SMS per month.

Secondly, I recommend using a social sharing plugin. This makes it easy for readers to share articles to their social media accounts. All they have to do is click on the social sharing icon (e.g. Pinterest P icon) enabled with the plugin to share the post.
There are many social sharing plugins. I decided on Social Pug because it’s lightweight (doesn’t slow down your site) and shares a preferred image with a custom description (as opposed to selecting any image on that page). I want to make it super easy for the reader so that when the Pinterest icon is selected, you can only share the Pinterest image (and not accidentally share the Facebook image).
I started with the free version of Social Pug. Then I upgraded to the pro version for $29/year because it had a sticky bar for the mobile, which makes it easy to share posts on the mobile.
6) Set the feature image and category(ies)
This is a basic, but important step that is sometimes forgotten. Especially placing your post in a relevant category. This helps with organizing your site structure.
It’s also an SEO tactic! You’re helping Google understand what your post is about. The more posts associated with a category, the more likely Google will rank you for that category.
7) Insert affiliate links
While every post should provide value to your readers, don’t forget to include affiliate links if there are opportunities to include it.
Affiliate marketing is one way to make money through your blog. If you’re new to affiliate marketing, it’s when you get paid for mentioning a product or service you love to your readers. (I strongly recommend only partnering with affiliate programs with products and services that you trust and use!)
If you’re a new blogger and you’re worried about not gaining acceptance into affiliate programs, here are the affiliate programs I was approved for and rejected from within my first 3 months blogging.
Some affiliate networks I was approved for that have hundreds to thousands of recognized brands and products (there will certainly be a product you already recommend) are:
- Shareasale (from NBA.com Shop to Gymboree)
- Amazon Associates (All products sold on Amazon)
- FlexOffers (including Groupon, Target, Kohl’s, Nordstrom Rack, Trip Advisor, Macy’s)
Here’s how I made money through affiliate marketing in my 3rd month blogging.
8) Edit ruthlessly
It’s easy to get attached to your words. Keep in mind that you’re writing for your reader who has limited time and is probably scanning your article.
Edit again and again! I edit posts 3x on average for readability, spelling, grammar and format. I still often find mistakes on the 3rd round!
Typos can be easily detected with Grammarly. It’s a FREE Chrome extension that allows you to check your spelling and grammar directly in your browser. A reader emailed me recently giving me a heads up that I had misspelt a word in an article. I was grateful for the tip and also embarrassed because this could have been easily avoided.

I highly recommend getting another person to edit your post as well. They’re approaching your content with fresh eyes.
Here are a few other editing tips that I continue to work on:
- Check links and make sure they all open in a new tab to the right site. Broken links will annoy readers! Links directed within the same tab will turn readers away from your site.
- Make your post crystal clear. Try not to get off topic or be redundant.
- Add subheadings. This makes a post easier to read, especially on mobile, which is the predominant device my site is viewed on (over 60%)
- Make your paragraphs 1-3 sentences long. This is another tip to make your post more user-friendly for your mobile reader.
- Read your post on different platforms (e.g. computer, tablet, mobile). The formatting can vary on different devices. It might even be worthwhile to view it on different types of tablets or mobiles. For example, I’ve found that a post can occasionally look different on an iPhone vs. a Samsung Android.
9) Publish and share your post!
Now you’re ready to press “Publish” and share your post!
Of course, you’ll want to share it with the social media networks your readers use (e.g. Facebook, Pinterest, Twitter, Instagram). Perhaps you’ll also want to email your subscribers if the post is relevant to them.
Most of my traffic is from Pinterest and Facebook. When I publish a post, I post it to my Facebook page and pin it to relevant boards on my Pinterest account. I also schedule future pins in Tailwind. Tailwind is an official partner for Pinterest.
I recently went on a trip and didn’t have an opportunity to manually pin so I gave Tailwind a try. I love it! In less than an hour, I had my pinning scheduled out for the month!
My favorite part of Tailwind is the Tribes feature. You can share your post to your Tribe and reach other people’s readers. I’m in niche Tribes so all of the bloggers have related content and therefore relevant readers!
If your Tribe member shares your pin to a board with large numbers, your pin might take off! This is what happened to me when I went on vacation. I couldn’t believe that doing nothing could result in high traffic. You can get a FREE month of Tailwind here.
10) Find relevant older posts and insert links to your new post
Like how in your new post, you would insert links to related internal posts, it’s important to do the vice versa! It’s worthwhile for SEO as it will potentially keep your reader on your site for longer and reduce your bounce rate.
It’s also valuable to provide the reader with more information that might address any lingering questions or thoughts.
11) Respond to comments on the post
This is something I think is extremely important! Your reader took the time to read your post AND left a comment. It’s nice to respond. Even if it’s just to say thanks and acknowledge the comment.
If it’s a question or a negative comment, you should definitely respond! This possibly means your article is not as detailed as it should be. Other readers might have the same thoughts, but just not say anything. Address these comments head on. You don’t want there to be any misunderstandings.

Recap of the ultimate blog post checklist
- Check that the content speaks to the reader
- Include a call to action at the end of the post
- Write a CLICKWORTHY title
- Optimize SEO
- Add social media shareable images and copy
- Set the feature image and category(ies)
- Insert affiliate links
- Edit ruthlessly
- Publish and share your post!
- Find relevant older posts and insert links to your new post
- Respond to comments on the post
I know there are a lot of steps, but it’s worth putting in the effort for your readers and to optimize traffic for your blog.
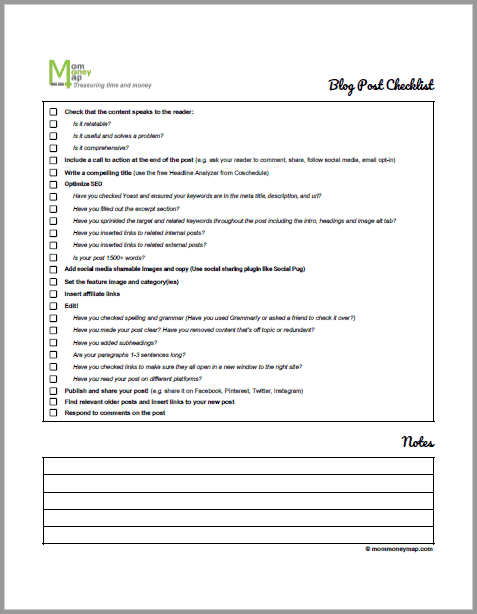
If you found this checklist useful, you can get the 1 page PDF printable for FREE here! It contains both the steps AND the important notes so you’ll never forget what actions you need to take to for example “Optimize SEO”.
You’ll also get access to new posts about blogging tips first AND additional blogging resources and ideas that are only shared with Mom Money Map subscribers. We respect your privacy. Unsubscribe anytime.
Primary blogging resources I use:
Siteground: When I was looking for web hosting companies for WordPress, I first came across Bluehost. It seemed that everyone was recommending them. Then I came across articles of bloggers who had difficulties with Bluehost from speed load time to customer service. That’s when I started noticing Siteground coming highly recommended. I haven’t had issues since. You can sign up with Siteground for as little as $3.95/month here.
Kadence: If you want to be able to customize your site, but you don’t know the first thing about coding, look into Kadence. It’s a drag and drop builder so you don’t need to code. You have access to 80+ themes or you can create your own site. If you have questions, you can contact their customer service team. This theme has a FREE version and it is known to be one of the fastest themes (It won’t slow down your site.).
Stencil: Stencil makes it easy and fast to create images for your website. There are over 2 mil royalty-free photos, 680 templates, 1 mil icons, tonnes of preloaded sizes or easily create your own etc. Maintaining a website involves a lot of learning and time. I love using Stencil because it saves you so much time for the image creation part of the process.
Related Blog Tips’ Posts:
- How to start and make money from a blog
- How I made my first affiliate sale
- Affiliate programs and networks I got approved for and rejected from as a new blogger
Enjoyed this post?
It would be great if you could share it and follow me on Pinterest or Facebook.


Very well summarized post. keep up the great work.
Thanks, Nadia!
This is a great blog post for beginner bloggers because you are absolutely correct, blogging is indeed a business and you should treat it as such from day one! (in my humble opinion). I know that’s how I always treated it and that’s the reason I was able to monetize my blog quickly. Loved your 11 steps.
Thanks for sharing,
Amira at ASelfGuru
Thanks for your comment, Amira. Your accomplishments in such a short period of time are inspiring!
This is a great list!! I hadn’t thought about using the excerpt field before in my blog posts. Thank you!
Thanks, Sasha! Glad to hear you learned something new from it!
Thank you for your article. Would you be able to expand on what you mean by “good quality content”? Since content is “king” we should be able to know good quality when we read it and write it. Unfortunately, just because people have had blogs for many years, doesn’t mean what they write is any good so what are some good examples that will let us know we have done it correctly?
Good question! Good quality content is honest. Real. It’s not a copy of someone else’s article. It’s original and shares the author’s unique perspective and voice. Good quality content is also well-researched and accurate. It doesn’t over-promise. There are actionable tips. How do you know if you’ve done it correctly? Your statistics and comments will probably help you understand if your content is engaging and thought-provoking. Thanks for your questions!
You explained all the tricks well. I have found some useful info on this post and some I knew about but wasn’t doing, and others I’d never heard about before so thanks for sharing.
Thanks for sharing such a great post
Thanks for your nice comment, Rajesh! I’m so glad you found this blog post checklist useful!
How many followers would you recommend having before applying to affiliate programs?
Thanks for your question! In my experience, you don’t have to have a certain number of followers before applying to affiliate programs, but it depends on what the affiliate program’s specific requirements are. Here’s an account of what happened to me during the first few months of starting the blog and applying to affiliate programs.